Monday, December 28, 2015

new year's eve menu

I hope that all of you had a very merry Christmas!

Though I'm still trying to recover from all the food I had on Christmas Eve and Christmas Day {so many sweets!}, I wanted to share some ideas for a New Year's Eve menu. My family and I always try to keep some food traditions - noodles for long life and something round for prosperity - so I made sure to keep those in mind when looking for recipes. Don't worry, I'm always looking out!

Enjoy!

New Year's Eve Menu: Stylish Sips // A Style Caddy

New Year's Eve Menu: Sweet & Savory {Desserts & Entrees} // A Style Caddy

Friday, December 18, 2015

chocolate peppermint baked donuts

Chocolate Peppermint Baked Donuts // A Style Caddy

One of my favorite holiday flavor combinations is peppermint and chocolate. I started thinking about making these donuts before Thanksgiving. Seriously! I've been waiting over a month to make these.

And now I'm sharing the recipe with you! You can make these this weekend or next week. It would be a great Christmas morning addition to your breakfast spread! I have it on good authority that these are even better the second day. So make them the night before Christmas so that you don't have to worry about anything on Christmas morning and will have the most delicious chocolate and peppermint donut. Everyone will love you. I promise.

Ingredients:

Chocolate Cake Donuts:
3/4 cup granulated sugar
1 1/4 cup all-purpose flour
1/4 cup cocoa powder {dark cocoa powder works well here}
1/2 tsp baking soda
1/2 tsp baking powder
1/2 tsp salt
1 large egg
1 tsp vanilla extract
2 tbsp unsalted butter, melted
1/2 cup sour cream
1/3 cup milk {I used skim milk}

White Chocolate Glaze:
1 cup white chocolate chips
1 1/2 cup confectioners' sugar, sifted
3/4 cup cream

Andes Peppermint Crunch baking chips for sprinkling

Directions:
1. Preheat the oven to 350℉. Grease your donut pan with non-stick baking spray.
2. In a large bowl, whisk together the sugar, flour, cocoa powder, baking soda, baking powder, and salt.
3. Stir in the egg, vanilla extract, melted butter, sour cream, and milk.
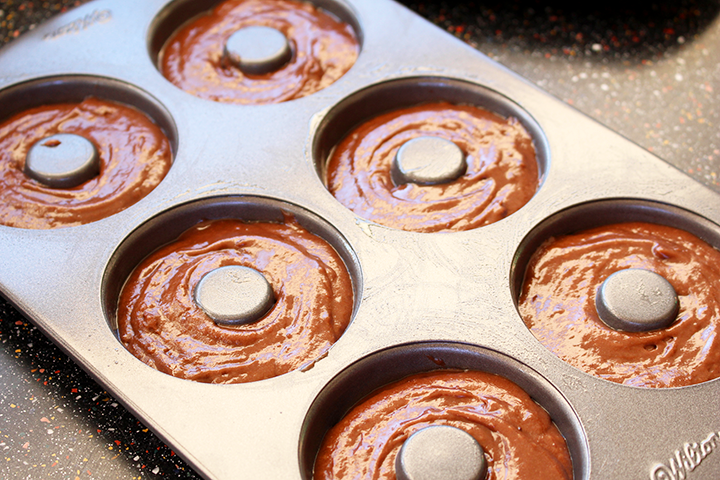
4. Transfer the batter to a piping bag or just a Ziploc bag and snip off a corner. Pipe into the donut wells about 2/3 full.
5. Bake the donuts for 13-15 minutes. When you touch the top, it should spring back.
6. Let the donuts cool in the pan for 5-8 minutes before transferring to a cooling rack.

White Chocolate Glaze:
1. Melt the white chocolate chips in a microwave-safe bowl for 45 seconds. Stir and melt in 20 second increments until melted. Note: Don't keep microwaving this until all the white chips are completely melted. You should stir in between because the heat should help melt the remaining chocolate chips. White chocolate seizes much sooner than regular chocolate!
2. Stir in the sifted confectioners' sugar. Another note: I was lazy and didn't do this and it shows. If you want a smooth glaze, you need to sift the sugar.
3. Add in the cream until you get a thick but still pourable glaze. You may not need the full amount.
5. Dip the completely cooled donuts in the glaze. Place back on the cooling rack with parchment paper underneath to catch the excess glaze. Then, sprinkle or place the Andes Peppermint Crunch on top.

Enjoy!

Chocolate Peppermint Baked Donuts // A Style Caddy

Chocolate Peppermint Baked Donuts // A Style Caddy

Chocolate Peppermint Baked Donuts // A Style Caddy

Wednesday, December 16, 2015

louis vuitton bag reveal

Want to know what I did with some of the money I saved from my reverse 52 week money challenge? Well...

I bought my first Louis Vuitton bag!

It might not seem so exciting to you, but I've been thinking about this for nearly two years {!!!} and couldn't wait to actually have this. I made a whole video about it to tell you about why I saved, my pretty awful buying experience at the Louis Vuitton store {sad face}, and show you what I keep in my bag.


Monday, December 14, 2015

reverse 52 week money challenge


In 2014, I decided to try out a savings challenge I had seen on Pinterest. It was the 52 week money challenge, and it seemed simple and easy enough.

All you had to do was deposit a certain amount of money into your savings account each week. On the first week of the year, you put in $1. On the second week, you put in $2 and so on and so forth. While I was able to complete it, I actually found it to be really difficult! At the end of the year, aka the holiday season when spending is at a high, I was depositing $49, $50, $51, and $52 each week. It might seem silly, but it actually stressed me out! Because I was buying Christmas presents, sending out holiday cookies, and doing this challenge, I felt like I was running low on cash pretty often. I knew that if I did it again in 2015, I had to budget my money better or find a different method.

I decided that the best way to do this challenge is to do it in reverse. So on the first week of the year, I put in $52 into my savings account. That way on the 52nd week of the year, I only had to worry about putting in $1. Even though the year isn't over yet, I've already completed the challenge because I didn't have to put in $202 into my account during the month of December.

I wanted to share my top reasons for doing this challenge with you and how to make it a little bit easier for you.

1. Do the challenge in reverse! Like I said, I found it much easier to start the year adding $52 and ending the year with just $1. It's much easier and less stressful during the holiday season.

2. You'll see a bigger addition to your savings account. I found that doing it backwards also motivated me more. And I think that's because I was seeing a bigger addition of money in my savings account much quicker. Immediate results!

3. Keep track of the dollar amount. I wrote myself a reminder in my planner of how much money I needed to put away each week. This meant that I saw it pretty much every day. I never forgot about it and it was the first thing I did on Friday mornings.

4. Add it directly to your bank account and not to a jar. Maybe the jar method works for you, but I know that adding directly to my savings account at my bank meant that I wouldn't touch the money I put there. Also, I rarely carry cash so making the transfer online is much easier.

5. You will save $1,378 in one year! This is by far the biggest pro about this challenge. In addition to the money I put into my savings at the end of each month, I saved nearly $1,400 more! You can put this money towards something you need or want or keep it there. It's all up to you! You can see what I did with some of my money on Wednesday...

For 2016, I'm debating on whether or not I should do it in reverse again or do the reverse double. That would mean putting in $104 the first week, $102 the second week, etc., and saving double the amount that I did this year.

Let me know if you give this a try or have done it in the past. I'd love to hear about your experience!

Monday, December 7, 2015

fifty gifts under $50

You would think that picking out fifty gifts under $50 is easy, but as I've discovered, it is the complete opposite! Oh my gosh, I had such a hard time creating this gift guide due to a combination of feeling limited to just fifty products and wanting to find gifts for everyone you might have on your list. Everyone from your parents to your best friend to the little kiddies to the home baker. So many people! After spending hours trying to narrow down my selection, I am happy with the range of gifts I picked. And now I can finally share it with you

Happy Gifting!


Latest Instagrams

© A Style Caddy. Design by FCD.